
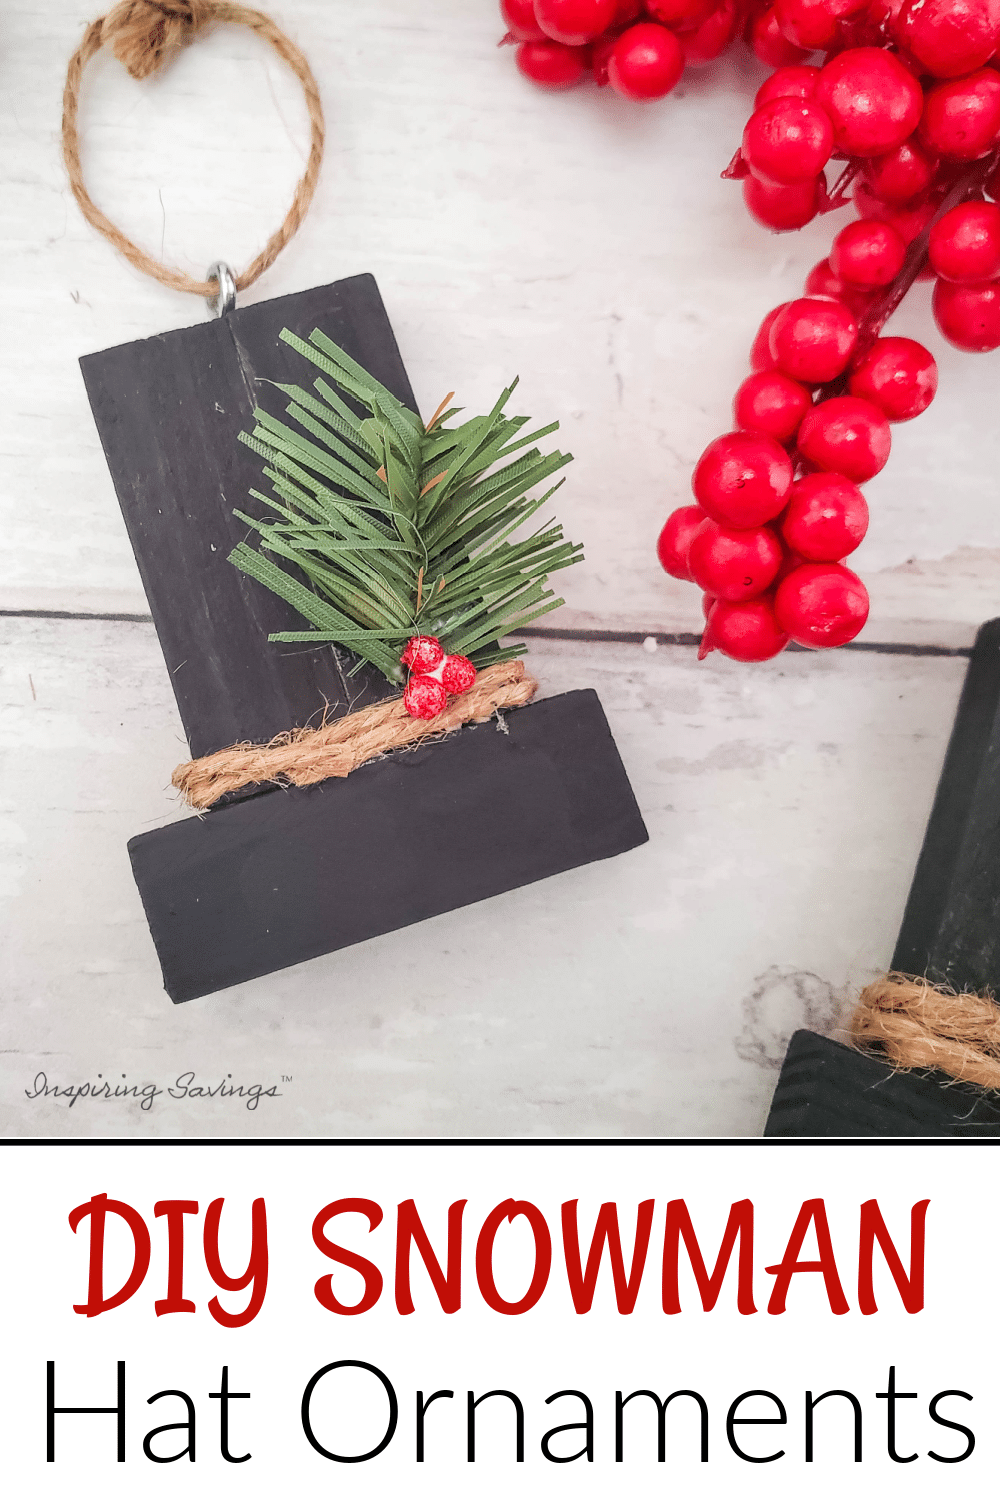
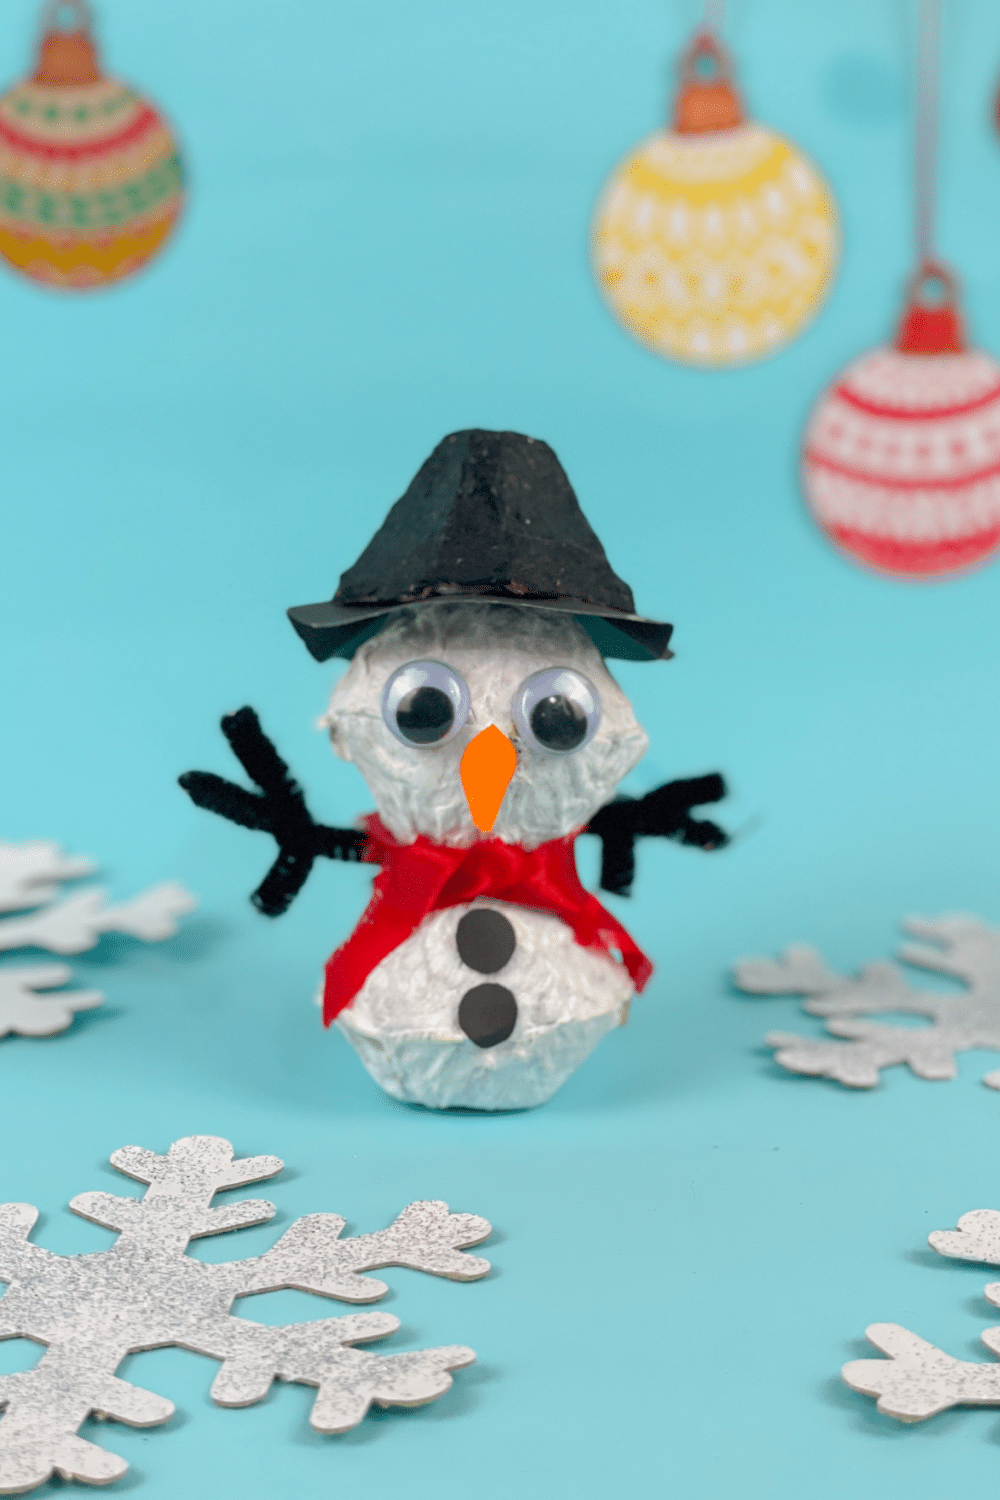
Homemade Wood Snowman Hat Ornaments Craft
You’ll love these rustic DIY Wood Snowman Hat Ornaments for your Christmas tree or to place on wrapped presents. With just a few inexpensive materials, you can create these statement-making ornaments!
Our family has so much fun making DIY Christmas ornaments every year in the weeks leading up to Christmas. And it would not be the Holiday season without a few homemade ornaments.
These wooden snowman hat ornaments would be a cute addition to the decoration for DIY gifts like a plate of Homemade Fudge or a jar of this brown sugar facial scrub, too. You can also tie them onto presents for under the tree by looping your gift ribbon through the twine and tying a bow with the ribbon.
Snowman Hat Homemade Christmas Ornaments
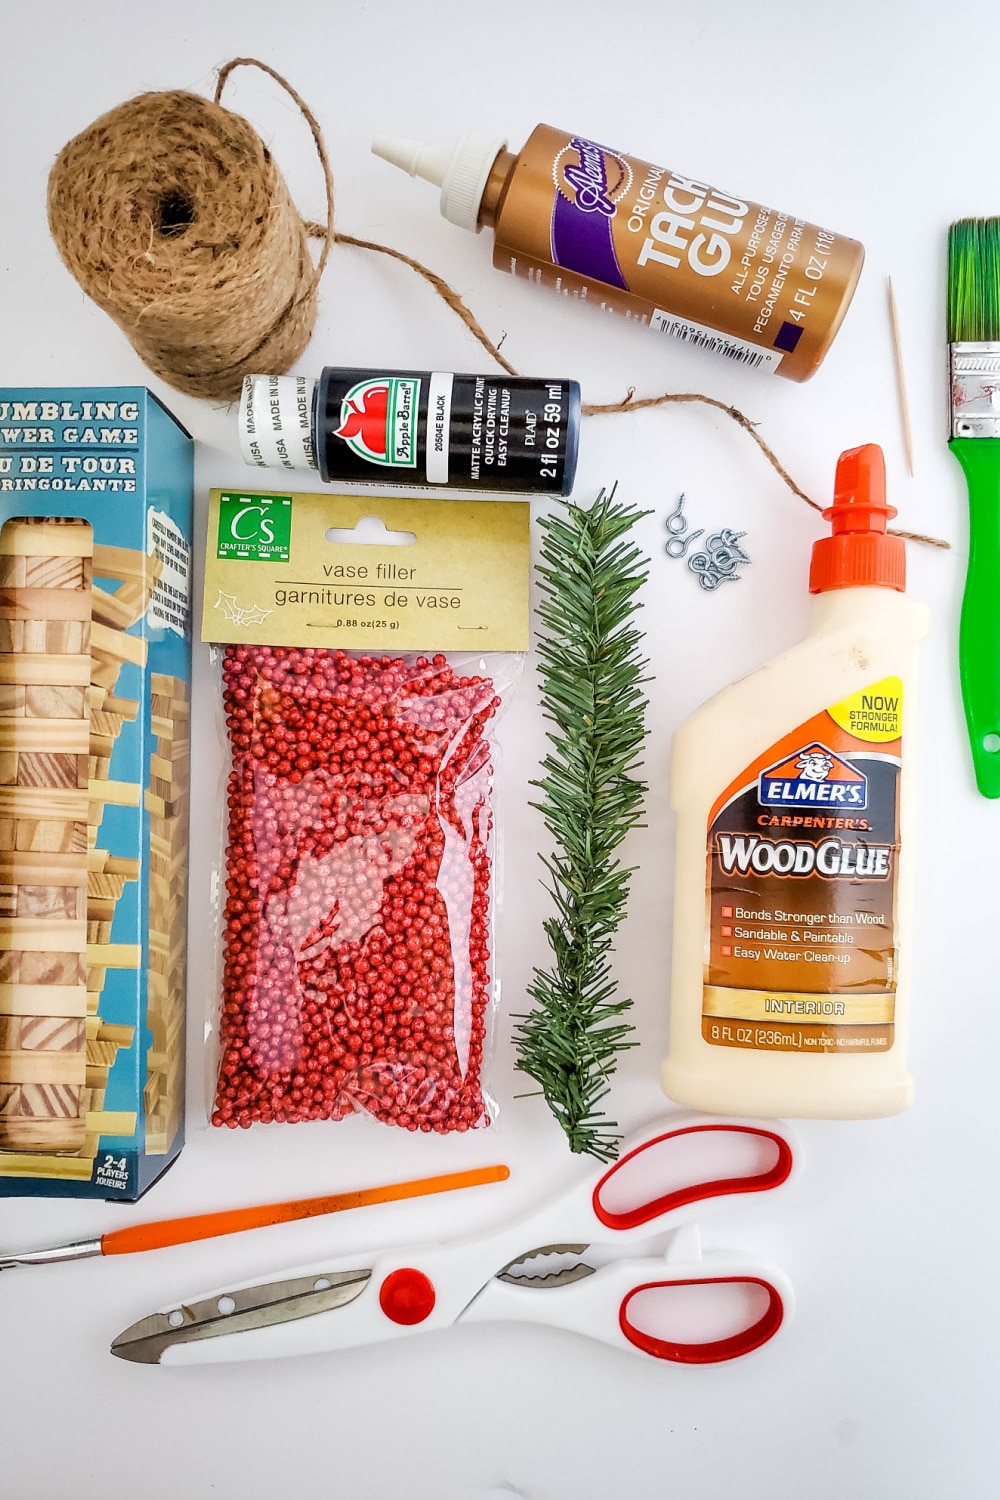
Materials Needed to Make
Pick up at your local Dollar Tree store.
- Blocks from the Tumbling Tower Game (Dollar Tree) or an old Jenga game
- Twine (Dollar Tree)
- Fake pine Christmas garland (Dollar Tree)
- Red vase filler (Dollar Tree)
- Eye hooks (hardware store)
- Wood glue
- Black craft paint
- Tacky glue
- Scissors
- 1-inch paint brush
- Small paintbrush
- Toothpick
Please Note: Stock can vary from store to store, and not every location may carry all the items. If your location doesn’t have one of the items, you may want to visit another nearby store to see if they have it. Which is what I did!
How to Make Snowman Ornaments
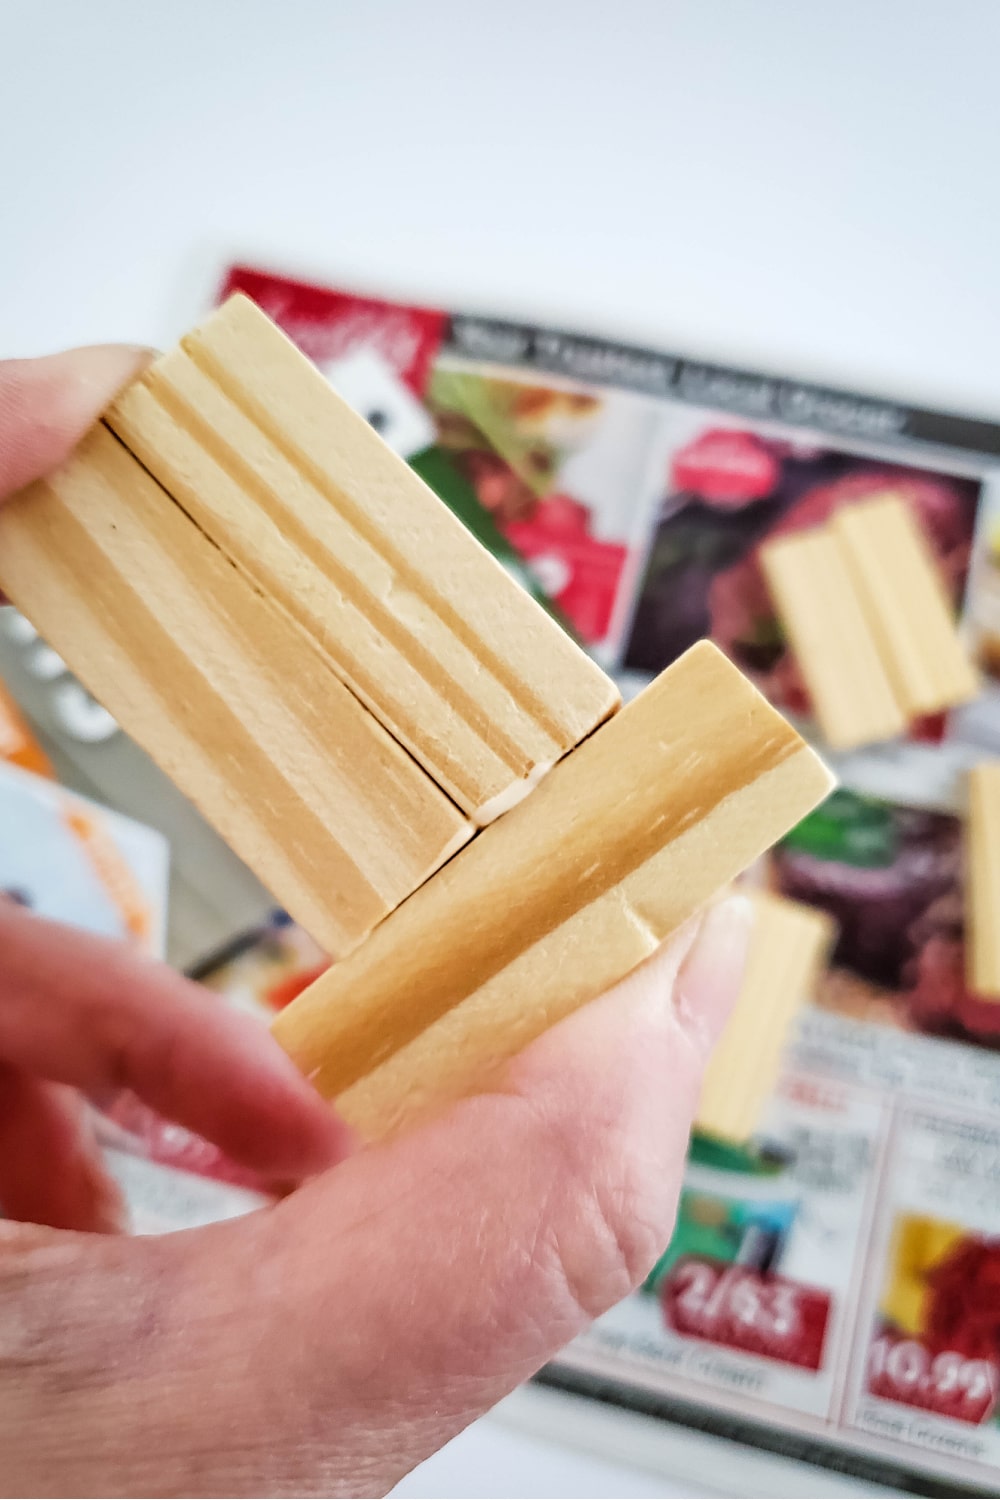
After gathering all of your supplies, the first thing we need to do is glue our pieces of wood together.
So, using the wood glue and a small paintbrush, apply glue to the side of a block, place another side of a block against it, and then hold it together for about 30 seconds, until secured with glue.
Then apply glue to the middle of another side of a block, and place it against the bottom of the two blocks that you glued together in the previous step. Hold together for about 30 seconds until secured with glue. Set down to allow the glue to dry completely.
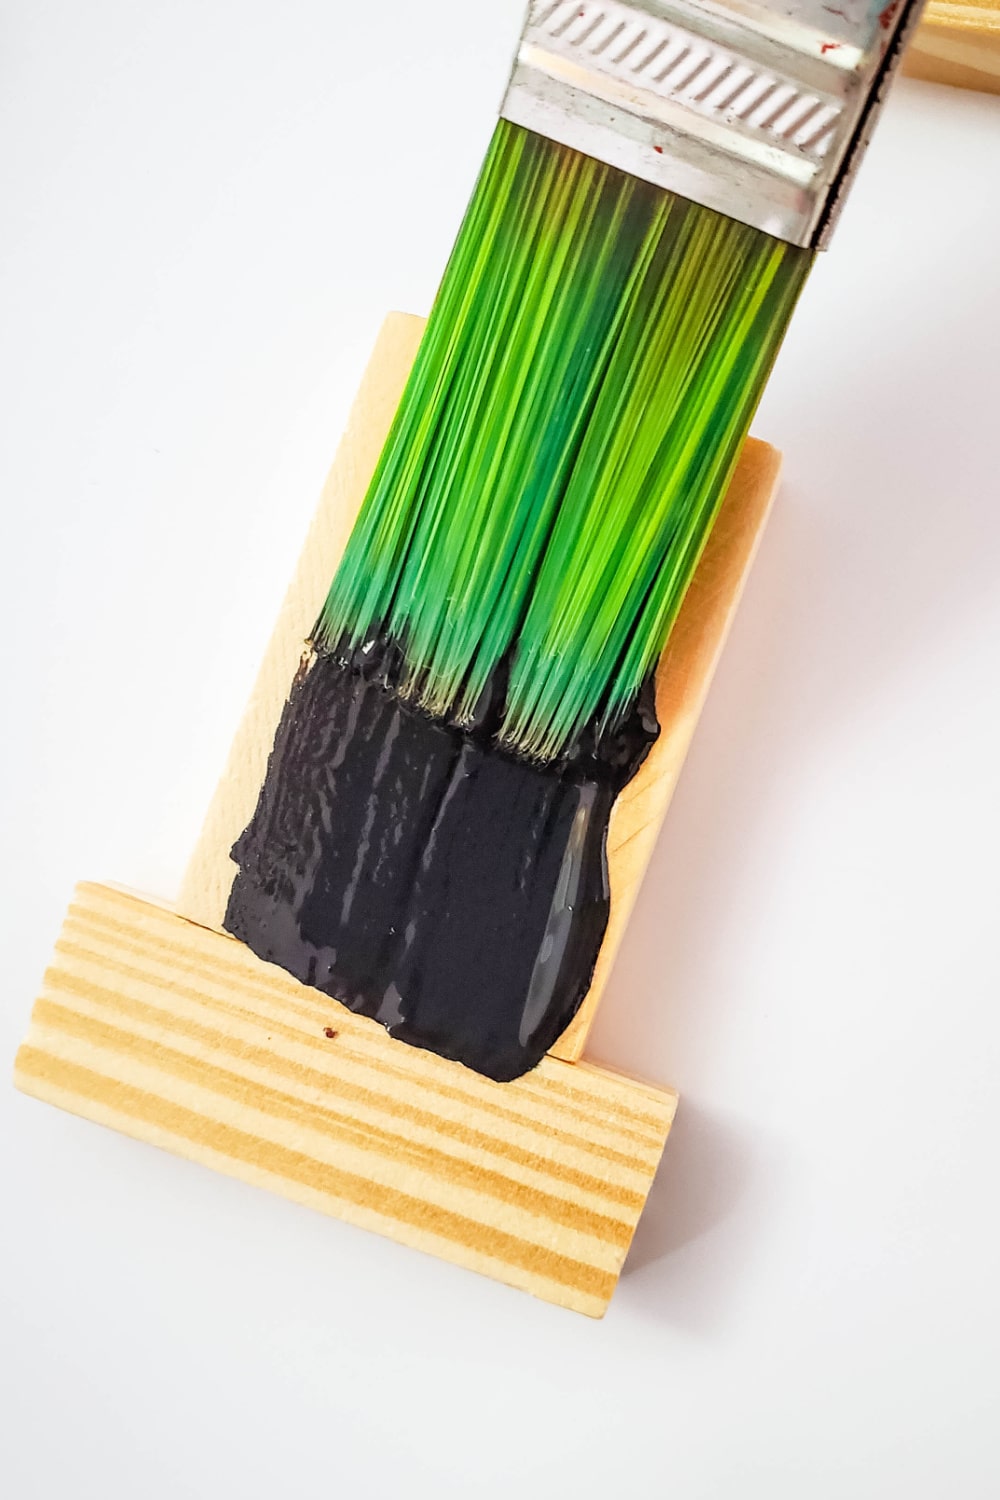
Next, using your 1-inch paintbrush, paint the entire surface (front, back, and sides) of the glued blocks. Set aside to dry.
If in a well-ventilated area and with a small fan going, your wait time for drying should not be longer than 30 minutes.
Depending on how many ornaments you want to make, you can cut all your twine at once, helping the process along. Like an assembly line. You will need two pieces of twine per ornament, and cut into 7” lengths.
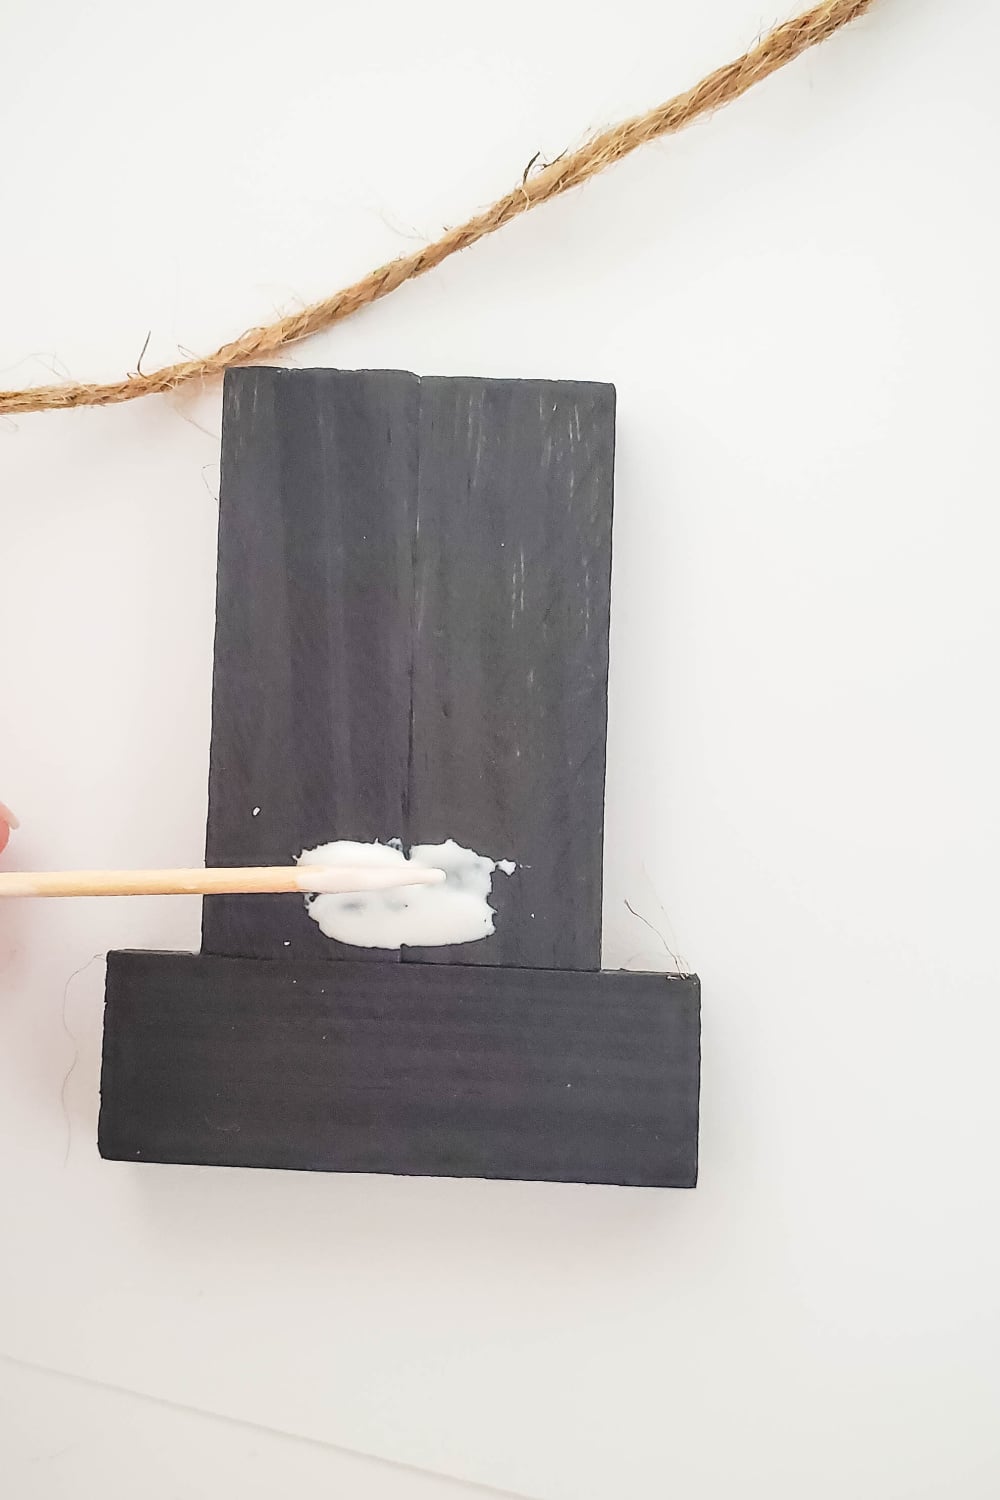
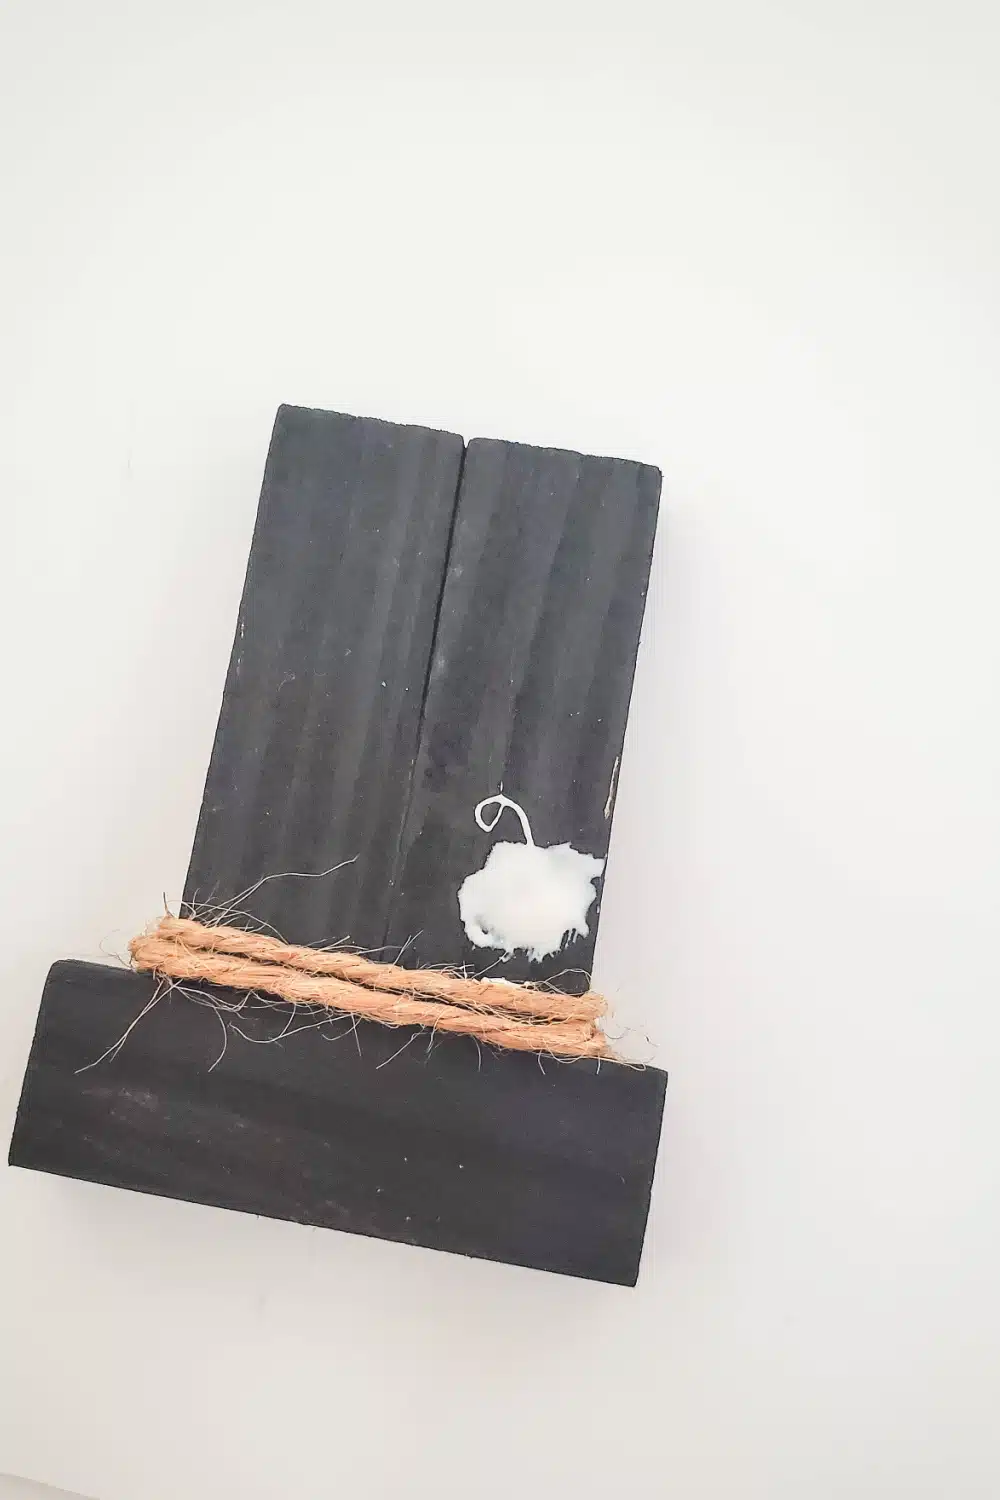
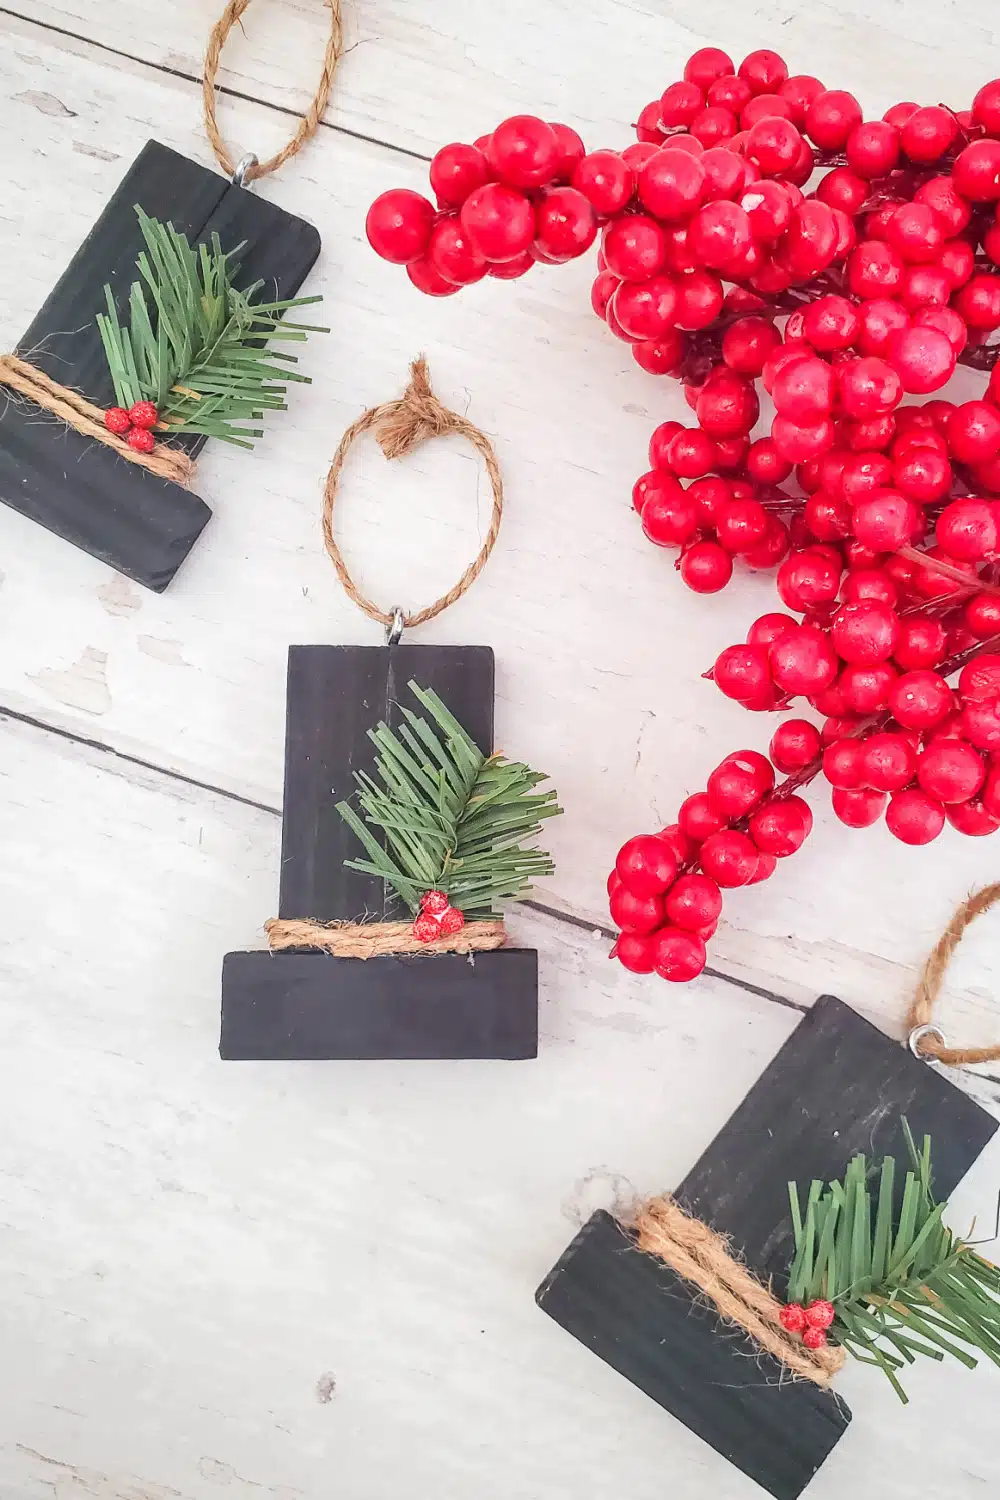
Using the toothpick, add a small amount of tacky glue to one side of the “hat”, where the 3 blocks meet. Set one end of the twine on top of the glue, at the very edge where all 3 blocks meet. Wrap the twine around twice, until the other end meets the end you just glued. Hold in place until secure.
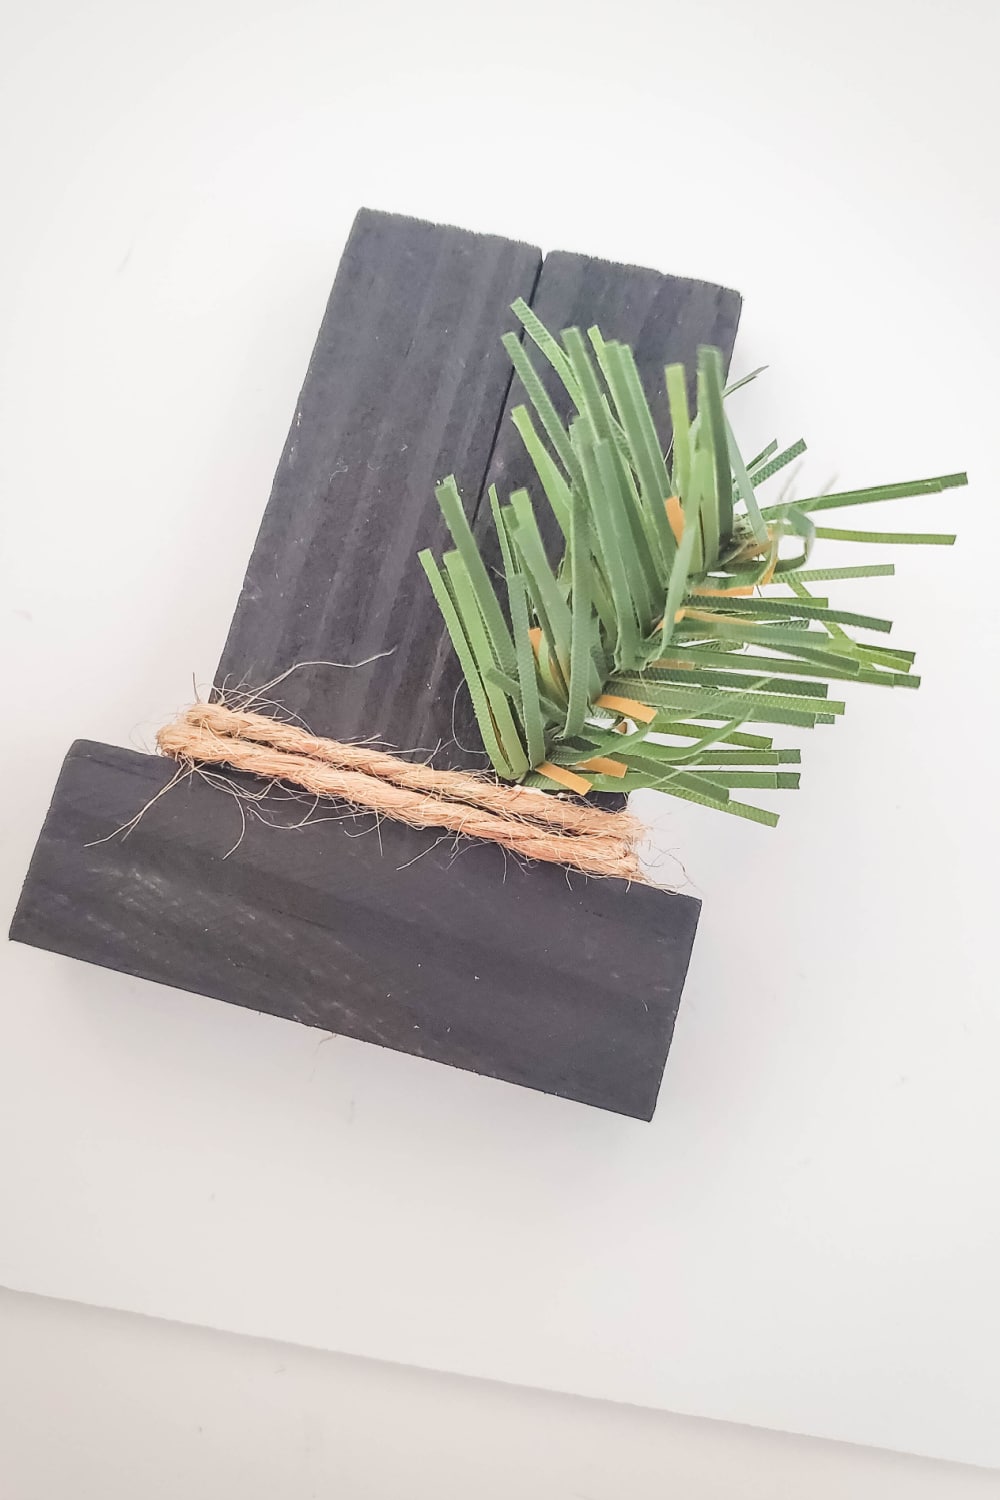
Cut a 1-inch piece off the garland. Using the tacky glue and toothpick, apply some glue to the corner of the front of the hat, above the twine.
Creating your holly sprig
After your glue is ready, press your piece of garland and hold until secure for about 30 seconds. Depending on your glue, it may take a little longer.
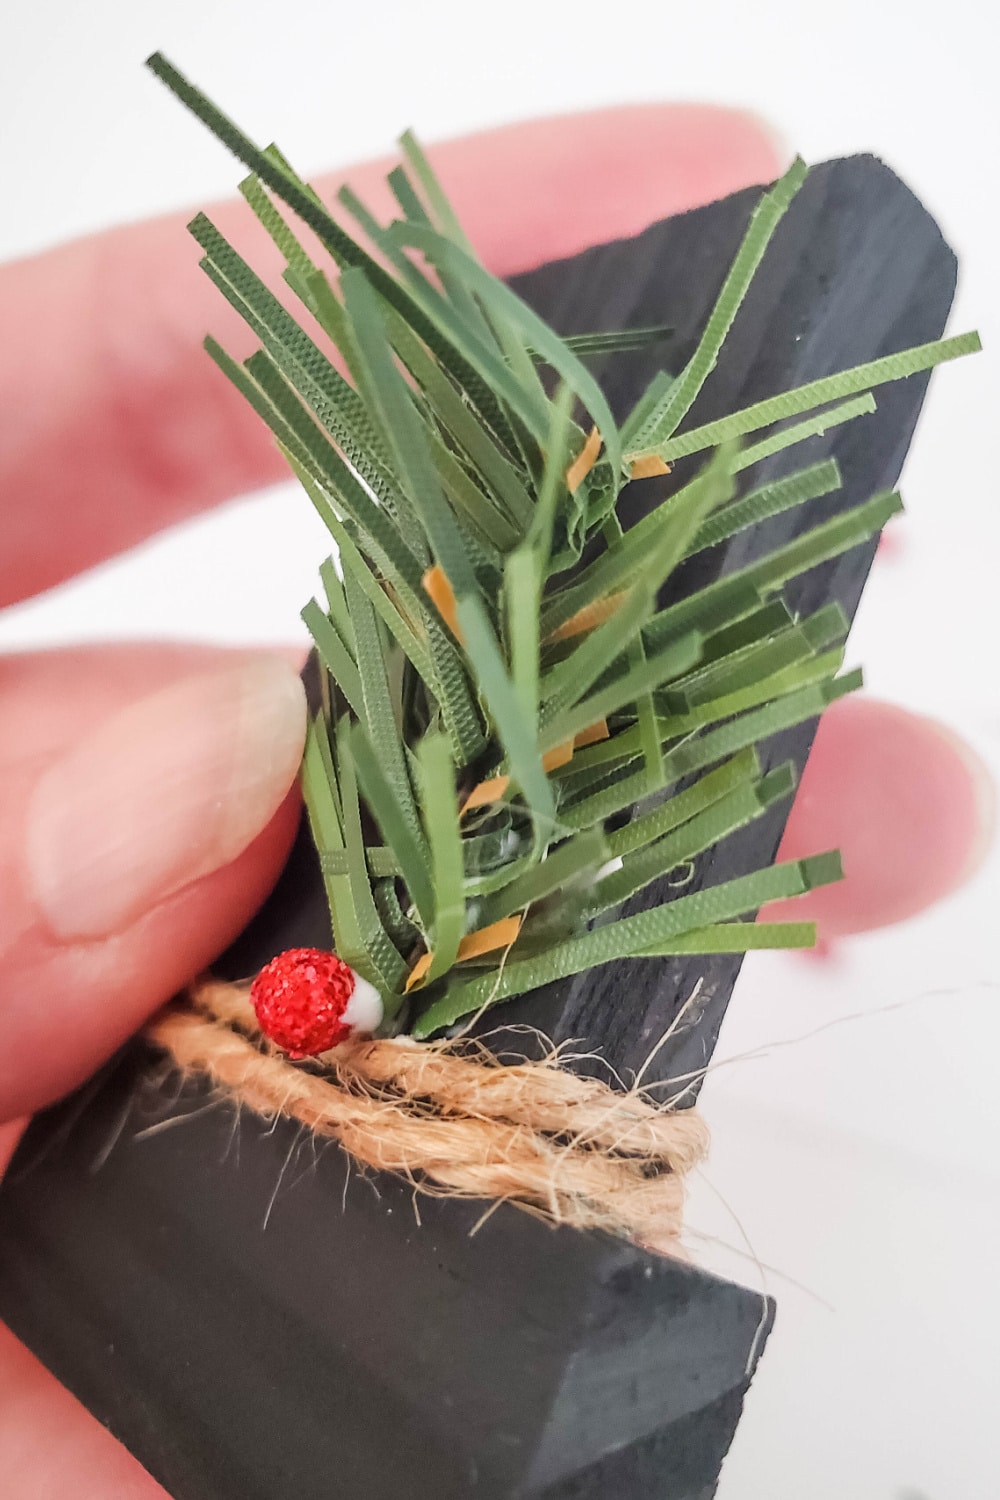
Now use the toothpick to apply a dab of glue to a red vase filler, then stick it to the garland, twine. You will do 3 of these, one on top, then two on the bottom, to form “holly”.
Then again, set aside to allow all glue to dry completely.
Adding the finishing touches
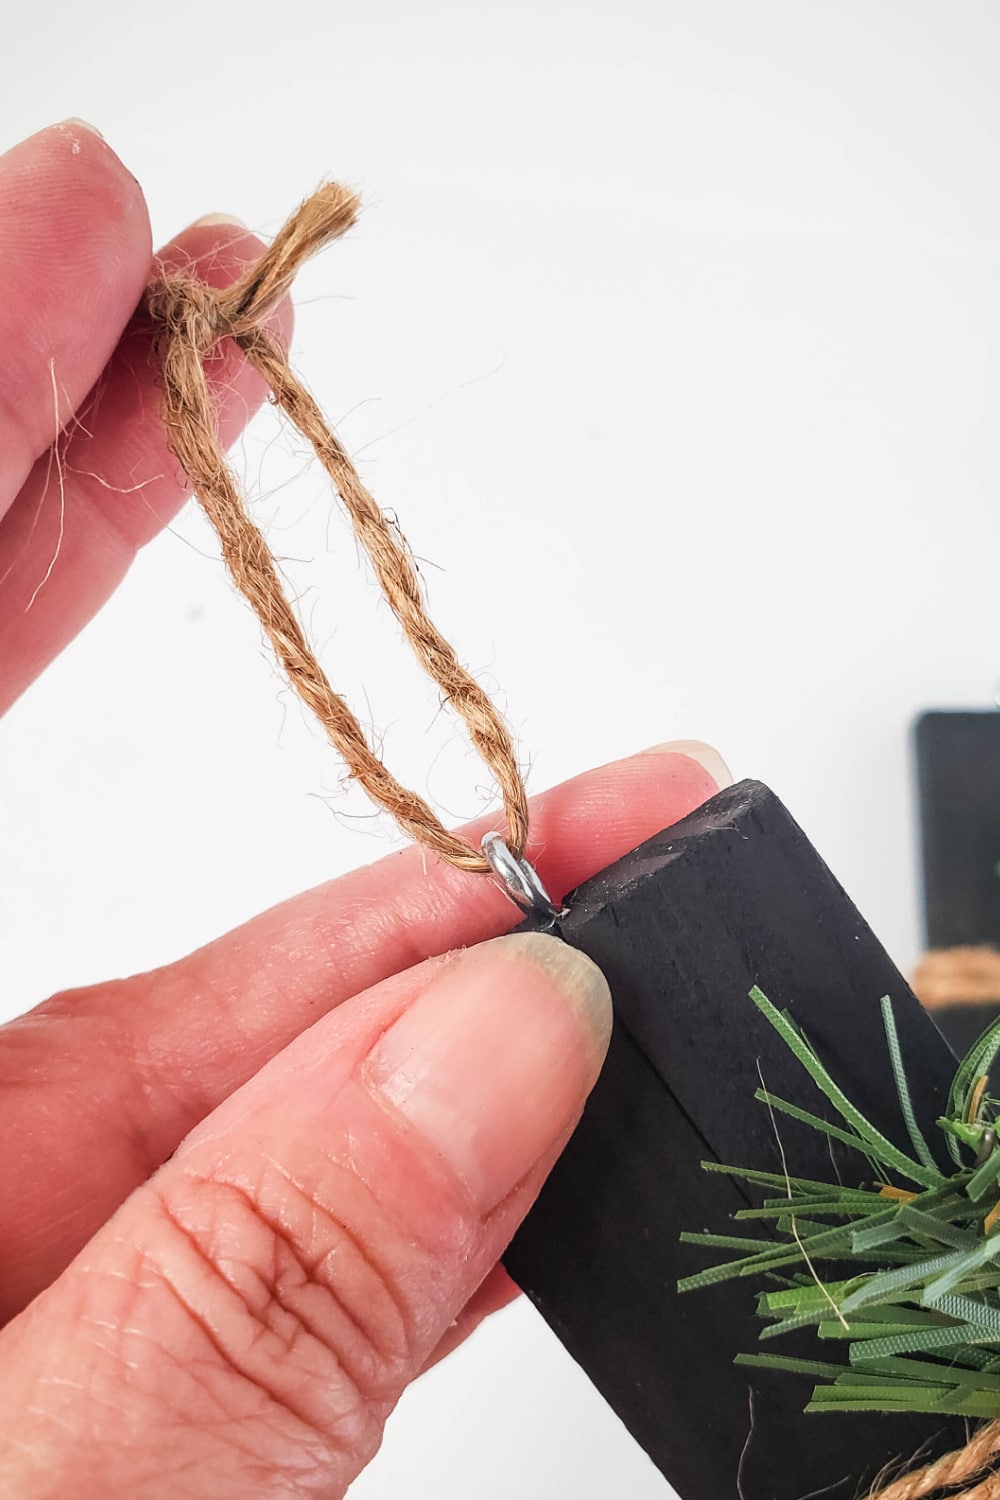
Lastly, screw an eye hook into the center of the top of the hat. Wrap a piece of twine through the eye hook, then tie the ends together.
Fun additional embellishment items to customize your ornaments
- To make your hats look more rustic by using a heat gun to darken the wood. If you do this step, I would skip out on painting your hats black.
- You can even customize by painting your hats red or green. To look like a Santa Hat.
- Add small white pom-poms across the base of your hat to make it look like a traditional Santa hat instead of a snowman hat.
- Or add texture by using a variety of different Christmas-themed greens.
More Christmas Holiday Crafts
Wood Bead Wreath Christmas Ornaments
DIY Tissue Paper Christmas Nativity Craft For Kids
DIY Christmas Snowman Hat Ornaments
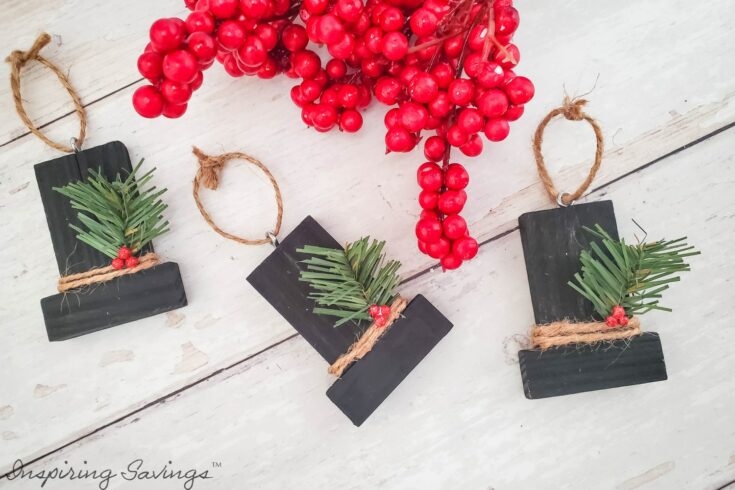
You'll love these rustic DIY Wood Snowman Hat Ornaments for your Christmas tree or place on wrapped presents. With just a few inexpensive materials - you can create these statement-making ornaments!
Materials
- Blocks from Tumbling Tower Game (Dollar Tree)
- Twine (Dollar Tree)
- Fake pine Christmas garland (Dollar Tree)
- Red vase filler (Dollar Tree)
- Eye hooks (hardware store)
- Wood glue
- Black craft paint
- Tacky glue
Tools
- Scissors
- 1 inch paint brush
- Small paint brush
- Toothpick
Instructions
- Using the wood glue and small paintbrush, apply glue to the side of a block, and place another side of a block against it, then hold together for about 30 seconds, until secured with glue.
- Apply glue to the middle of another side of a block, and place it against the bottom of the two blocks that you glued together in the previous step. Hold together for about 30 seconds, until secured with glue. Set down to allow the glue to completely dry.
- Using the 1-inch paintbrush, paint the entire surface (front, back, and sides) of the glued blocks. Set aside to dry.
- Cut the twine into 7” lengths. You will need two per ornament.
- Using the toothpick, add a small amount of tacky glue to one side of the “hat”, where the 3 blocks meet.
- Set one end of the twine on top of the glue, at the very edge where all 3 blocks meet. Wrap the twine around twice, until the other end meets the end you just glued. Hold in place until secure.
- Cut a 1-inch piece off the garland. Using the tacky glue and toothpick, apply some glue to the corner of the front of the hat, above the twine. Press the piece of garland to the glue, and hold until secure for about 30 seconds.
- Use the toothpick to apply a dab of glue to a red vase filler, then stick to the garland, twine. You will do 3 of these, one on top, then two on the bottom, to form “holly”. Set aside to allow all glue to completely dry.
- Screw an eye hook into the center of the top of the hat.
- Wrap a piece of twine through the eye hook, then tie the ends together
This post may contain affiliate links or sponsored content. Disclosure Policy

Very cool, would love to try this as I am a big fan of homemade stuff. I will save this to make it with my partner.
These are so cute! I had no idea there were vase fillers like that. What a fun idea for a craft. We do some DIY ornaments in the workplace and this would be great.
They turned out so very cute. Easy enough to make too. Well done.
How cute are these?!? They also look really easy to make, so that everyone can participate.
I love this wood snowman hat ornament! I am looking for new and unique Christmas ornaments to make, and this one is adorable. Thank you!
Awe. Thank you for letting me know!!
These DIY Christmas ornaments are so very clever. I would enjoy making these with the kids for our tree this year.
I love the idea of making cute homemade ornaments like this. I’m also a big fan of how easy they are. I’ll never be accused of being crafty, you know? LOL
That’s a nice craft, I have to practice that with my kids for this Christmas.
These are adorable. My neices would love to make these!
Awe, Thank you, Aimee! I bet they would. We had a lot of fun making them ourselves.
Very nice, the kids will love this for sure!
Wow! This is really cute. I am thinking of weekend activity for the girls and this is just perfect. Thank you for teaching us how. We can’t wait to make our own ornaments.
You’re Very Welcome Clarice. Have fun making them.
Wow! This is really cute. I am thinking of a weekend activity for the girls and this is just perfect. Thank you for teaching us how and we can’t make our own ornaments.
These ornaments are just so cute. And since they are relatively easy to make, I can imagine, a set of them makes also a great gift 🙂
Yes, for sure… Thank you for the comment.
I love this cute craft! I think that this would be super cute for me and my girls to make this weekend!
Home decorations are more special than store-bought decors. I love it. Thank you!
These are great. My girls would love making these for our tree.
These handmade crafts are amazing. Looking like they have been innoveted by an expert!
HA HA!!! Not an expert at all.. Just like to do crafts. But thank you for your complement.
This is so fun, Specially for kids. Thanks for sharing!
The ornaments are adorable. I would like them most as a gift topper. It’s really fantastic.
Thank you, Elisa. That is a great idea for them too.
Homemade decorations make for sentimental keepsakes. I love making decorations from scratch
So cute and such a fun craft to do with kids!
Thank you!
Oh how sweet! I love how creative this in and teaches a little bit about working with wood also. Lovely festive craft.
Thank you, Talya!