
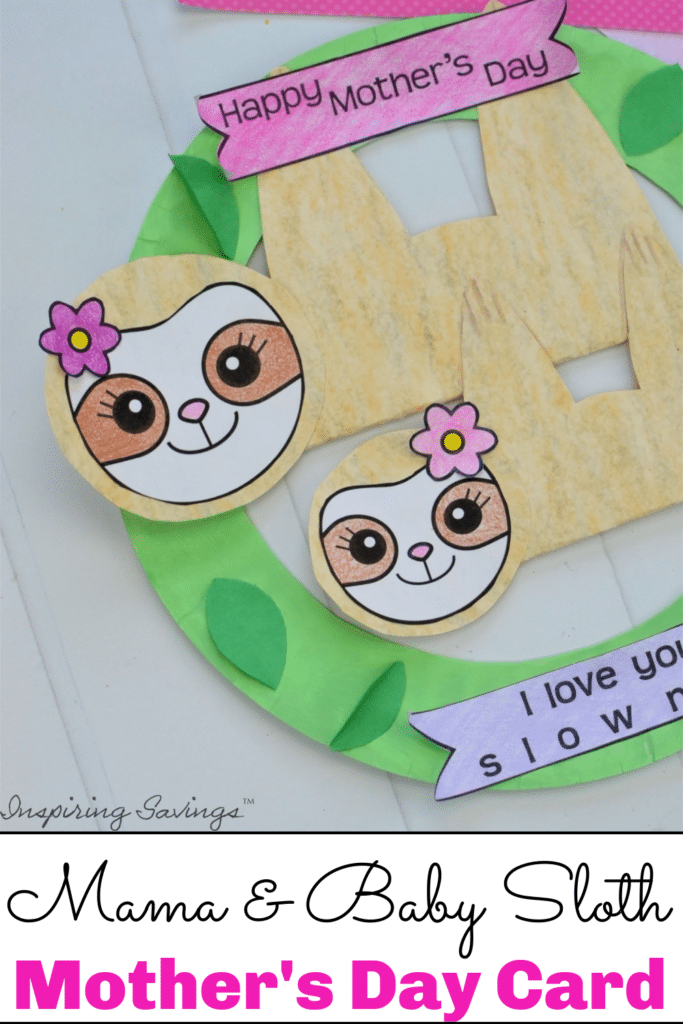
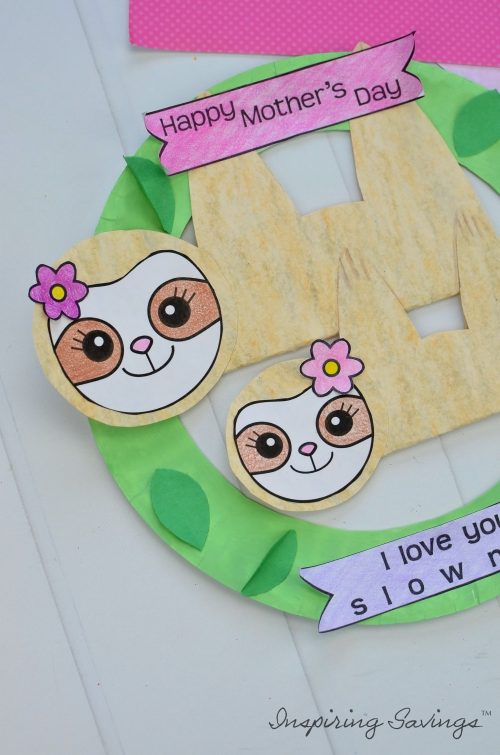
Heartwarming DIY Mother’s Day Card – Sloth Wreath
This is a Heartwarming DIY Mother’s Day Card that your kids can make! A great craft to celebrate moms and grandmas! Sleepy Adorable Sloths pair perfectly with a homemade paper plate wreath.
Heartwarming DIY Mother’s Day Card – Sloth Wreath
No need to spend big bucks on the perfect Mother’s Day Card from the store. Instead, your little ones can create something memorable and super adorable. Sloths are all the rage right now! Bet you didn’t know that.
They just scream, “Look at me, I am so cute.” Of course, they could scream, but instead, they just move slowly. HEY!! Does that sound like your children in the morning when you are trying to rush them off to school?
Yep, I was thinking the same thing. It does! This card is just so perfect in so many ways. Before getting started, I am very much a visual person, so I assume everyone else is too. I have many pictures to help you create your very own card. Plus, pictures do easily help little ones find their next step.
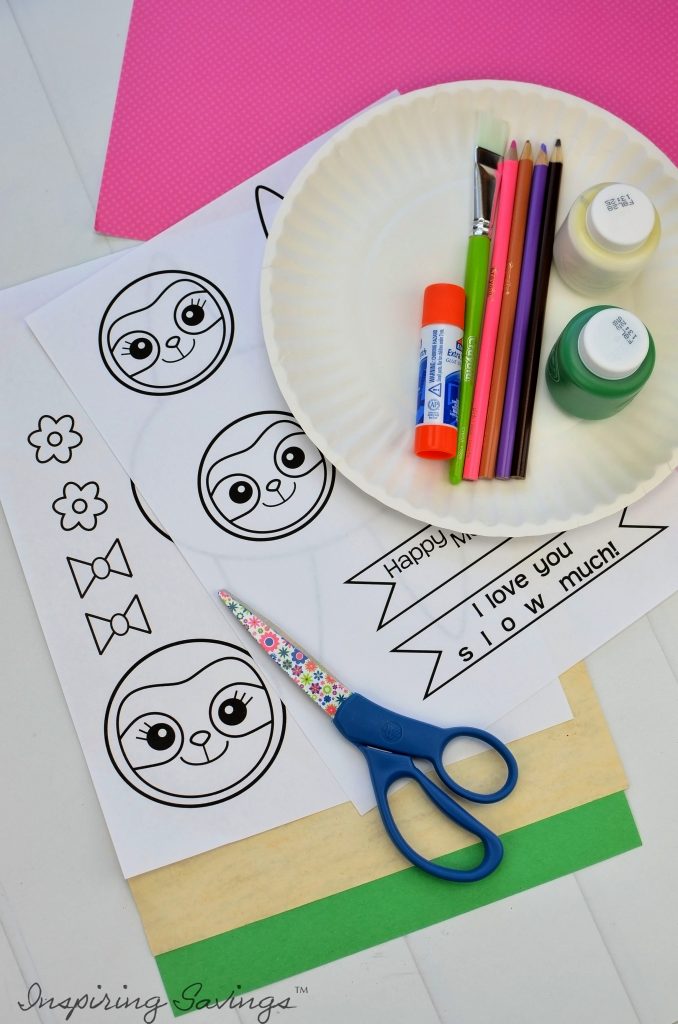
Supplies Needed For Mother’s Day Card
The card parts are provided as a free printable, and the rest is assembled with some everyday items around the house (that’s how we roll!). At the very bottom of this post, print out these instructions as well.
– 2-page template printed on printer paper (Template below)
– 2 sheets of tan or brown construction paper
– 1 sheet of green paper
– Light green paint (or mix green with white)
– Paintbrush
– Paper plate
– Colored pencils
– Glue stick
– Scissors
Print your Mother’s Day Card Template here!
Instructions To Make a Mother’s Day Card
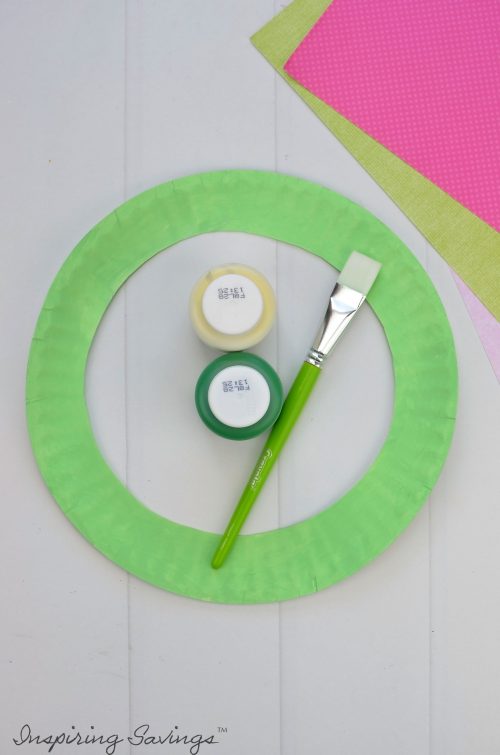
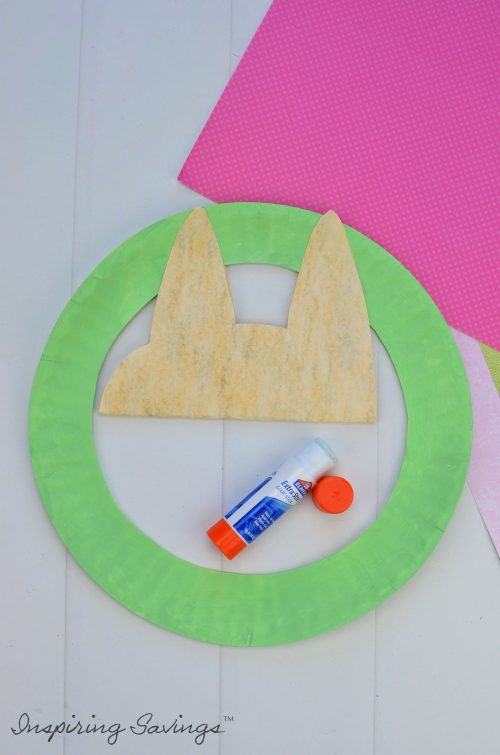
STEP ONE: First, start with the paper plate. Fold it in half and cut out the center circle, leaving just the border for the wreath shape. Next, paint it a light green. You may need to mix in white paint to lighten the green.

STEP TWO: While your paper plate wreath dries. Cut out the sloth bodies from the template.
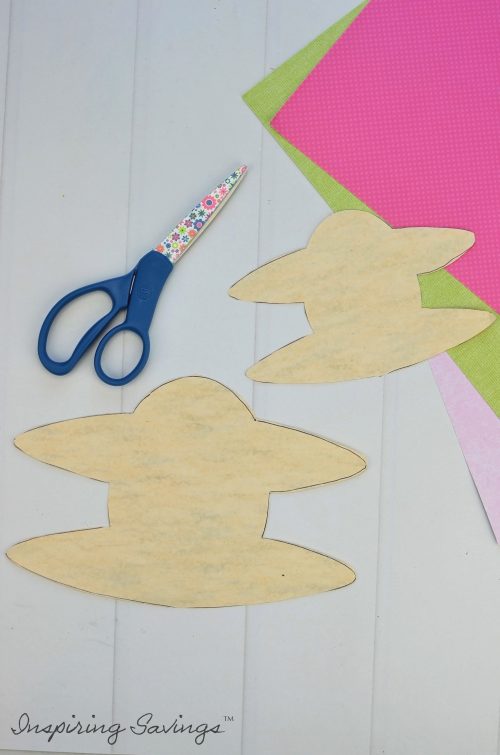
STEP THREE: Then, trace out the body templates onto tan or brown construction paper and cut out.
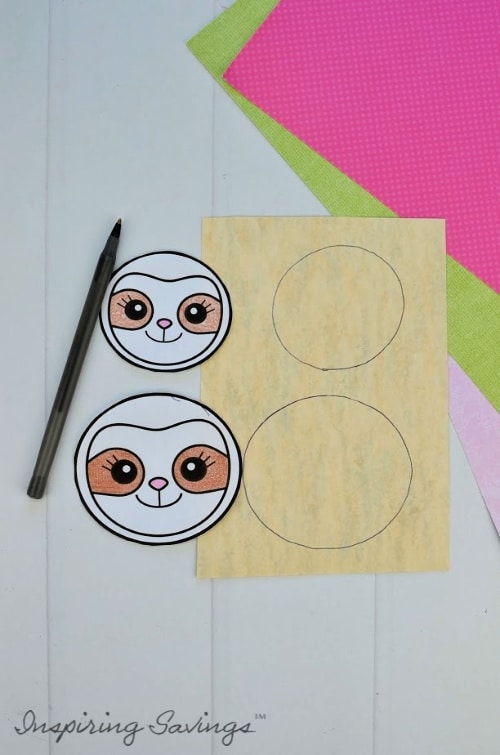
STEP FOUR: Cut the sloth’s heads out from the template. Color the eyes and faces with colored pencils. Next, trace the heads onto tan or brown construction paper. Cut out the construction paper circles and cut out the face shape from the sloth heads.
Then, glue the faces onto your construction paper cutouts.
STEP FIVE: To start assembling the Mother’s Day Card Sloth Craft, take the Mommy sloth body and fold it in half. Then, place the sloth’s body on the top of the wreath so it looks like it’s hanging down.
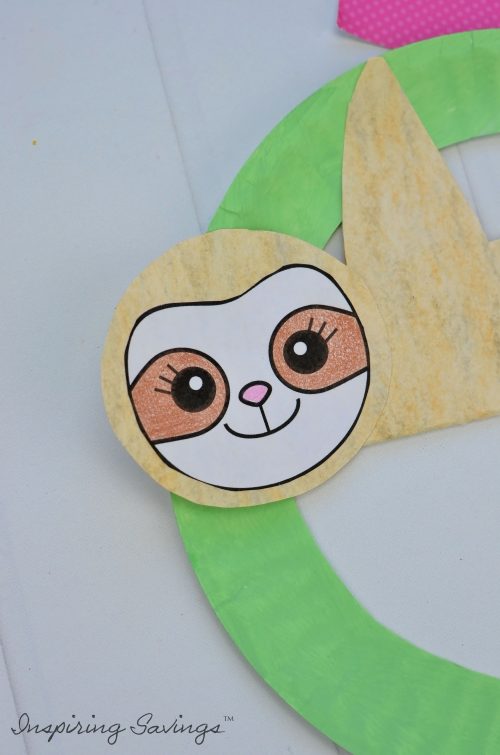
STEP SIX: Using your glue stick, rub glue on each hand and foot to secure the Mommy’s body to the plate. Then complete the Mommy sloth by gluing on the head.
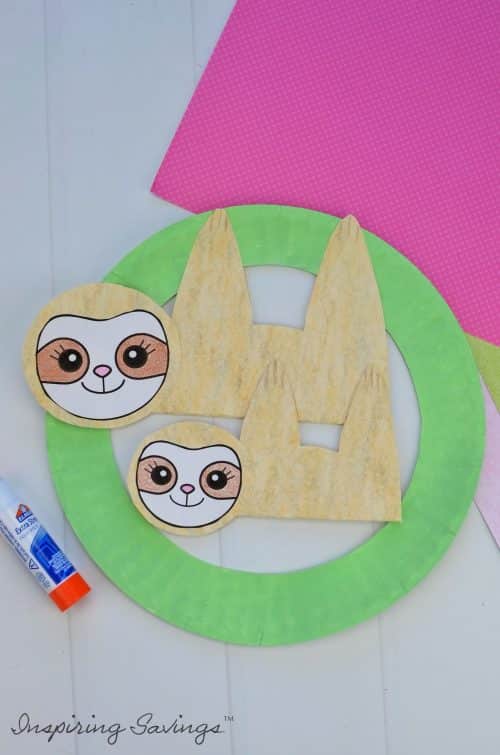
STEP SEVEN: Repeat this same process with the baby sloth.
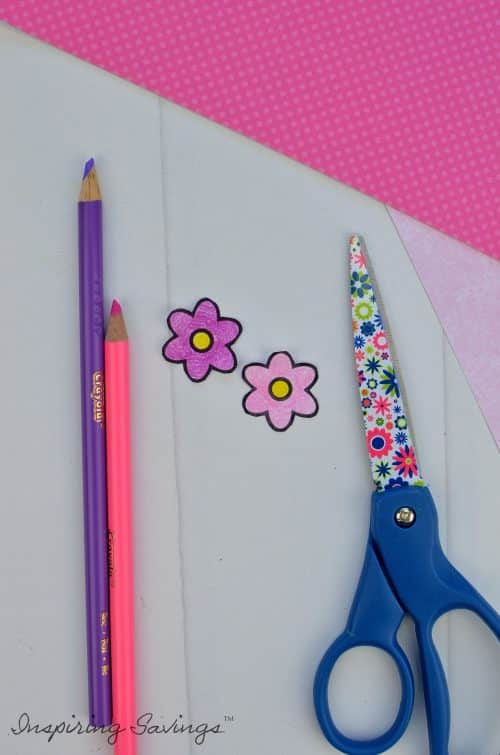
STEP EIGHT: Jazz up those sloths. Color some bows or flowers, cut, and glue them to the top of each head.
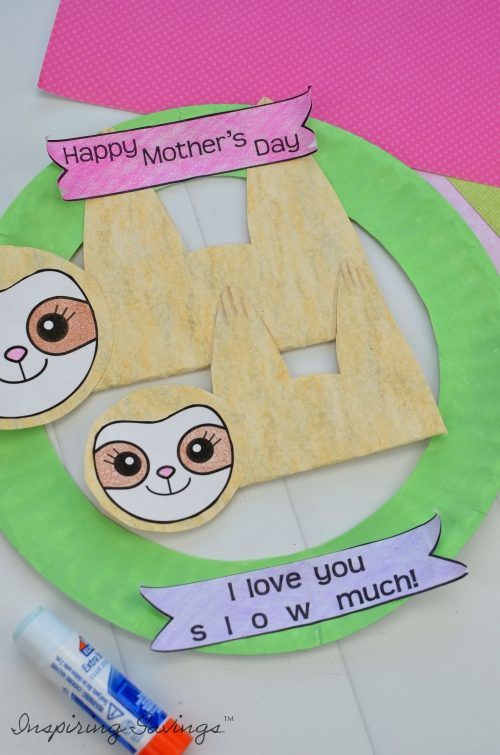
STEP NINE: Next, choose your banner. Color cute and glue to either the top or bottom of your wreath.
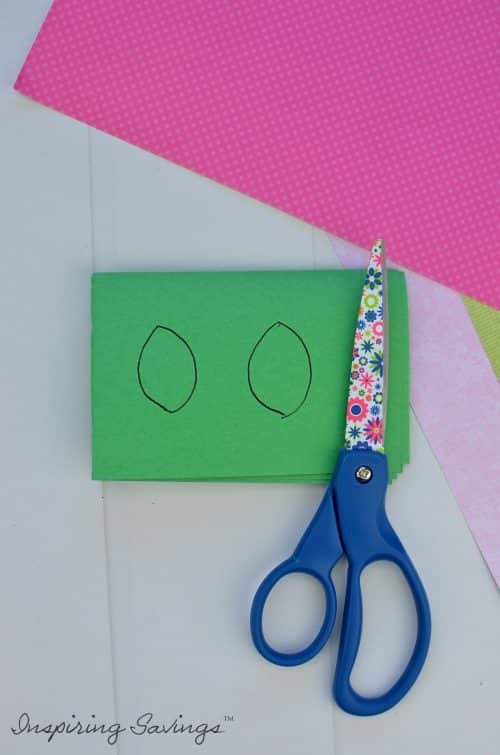
STEP TEN: Take green construction paper and fold it in half 3 times, rotating the direction of the fold every time. Draw two leaves. Yes, you are going to be doing this without a template.
Leaves are so different and do not need to be perfect. After that, cut out your leaves (going through all the layers of the construction paper). Take each leaf and fold it in half to give it a 3D effect.
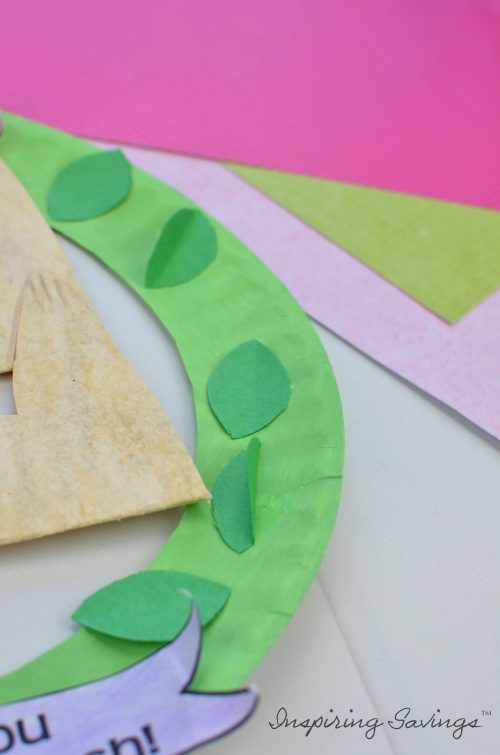
STEP ELEVEN: Glue the leaves around the plate in a random pattern to finish the craft. And that’s it you are done.
Other Adorable Craft Project Ideas
Easy DIY Father’s Day Monster Card Craft
Adorable Floral Dreamcatcher Craft
Adorable Valentine’s Day Paper Chain Craft
Mother's Day Sloth Card
This is Heartwarming DIY Mother’s Day Card that your kids can actually make! A great craft to celebrate moms and grandmas! Sleepy Adorable Sloths pair perfectly with a homemade paper plate wreath.
Materials
- 2-page template printed on printer paper
- 2 sheets of tan or brown construction paper
- 1 sheet of green paper
- Light green paint (or mix green with white)
- Paper plate
- Colored pencils
- Glue stick
- Scissors
Tools
- Scissors
- Paint Brushes
Instructions
- First, fold the plate in half and cut out the center circle, leaving just the border for the wreath shape. Now paint the paper plate light green, I combined regular green and white to make light green.
- While that dries, cut the Mommy and Baby sloth bodies out of the template. Trace the body templates onto tan or brown construction paper and cut out.
- Now, cut the Mommy and Baby sloth heads out. Color the eyes and face shape with the colored pencils. Now trace the heads onto tan or brown construction paper. Cut out the construction paper circles and cut out the face shape from the sloth heads. Finally, glue the sloth faces to the construction paper heads.
- To start assembling the Mother’s Day Sloth Craft, take the Mommy sloth body and fold it in half hotdog style so the hands are touching each other, and the feet are touching each other. Now, place the sloth body on the top of the wreath so it looks like it’s hanging down. Put a bit of glue stick on each hand and foot to secure the Mommy body to the plate. Then complete the Mommy sloth by gluing on the head.
- Repeat this same process with the baby sloth, attaching the arms and legs to the Mommy’s body instead of the paper plate.
- Give your sloths some accessories by adding bows or flowers to their hair. Simply color, cut, and glue them to the top of each sloth’s head.
- To add a little detail, use a brown colored pencil to add some nails to the end of each arm and leg.
- Then, color and cut the banners. Glue them to the top and bottom of the plate.
- Next, take the green construction paper and fold it in half 3 times, rotating the direction of the fold every time. Draw two leaves and cut them out (going through all the layers of the construction paper). Take each leaf and fold it in half to give it a 3D effect.
- Glue the leaves around the plate in a random pattern to finish the craft.
- The Mother’s Day sloth wreath is ready to hang!
This post may contain affiliate links or sponsored content. Disclosure Policy


This is so cute!!!
Awe. Thanks So Much Michelle!!!