
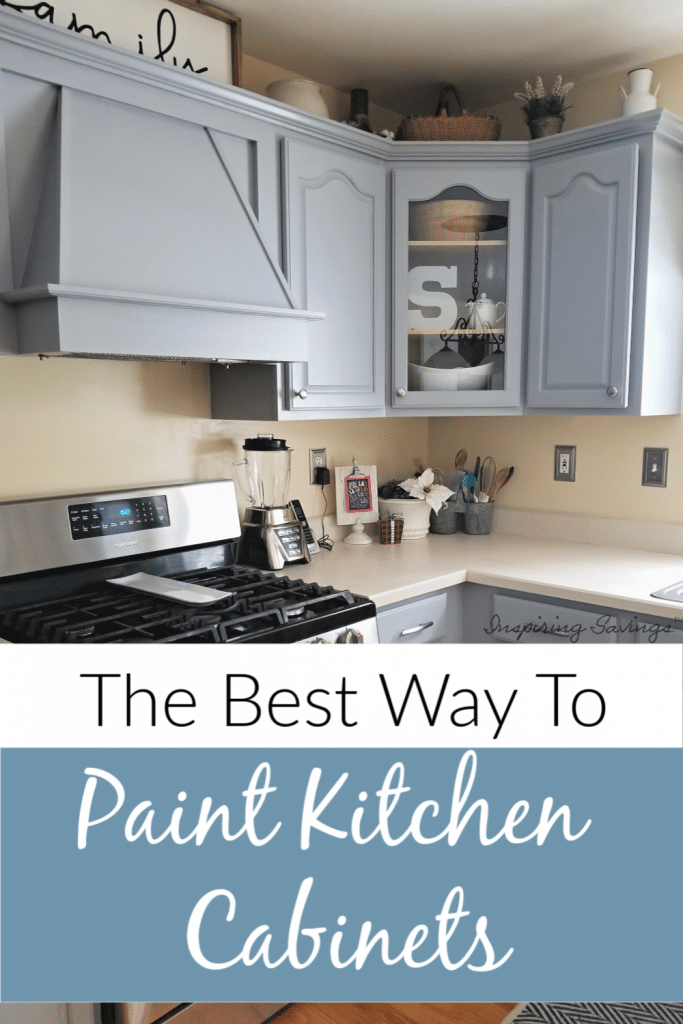
The Best Way to Paint Kitchen Cabinets – An Affordable Update
Are your cabinets old and outdated, but you’re unable to replace them yet? Learn the best way to paint kitchen cabinets. Learn about the best practices to keep your cabinets looking great for years.
There are so many methods and products available. Using the incorrect ones can be a costly mistake.
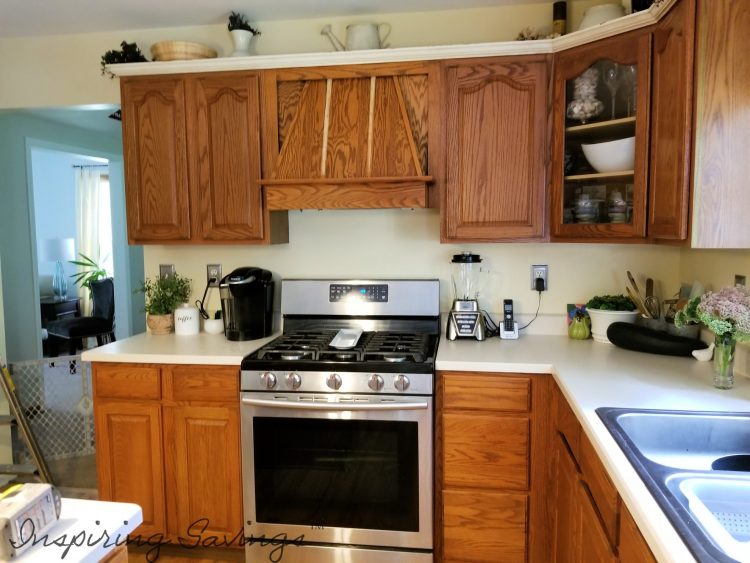
Despite spending a lot of your time prepping, priming and painting wouldn’t be awful in a few months, you begin to see chips or wear. I have spent almost a full year procrastinating and researching products.
This was not a task I was taking lightly. My perfectionism trait is not willing to make a compromise. By nature, I want to do this remodeling upgrade correctly. I know this is what we all want. Otherwise, you would not be checking out this article. Before you start, it is important to note that this project will not just take a few days, but a full week to complete.
And you will want to take up as much time as you can. No need to rush. Allowing your paint to be fully dry is imperative.
The Best Way to Paint Kitchen Cabinets
Choosing The Best Paint
There are so many kits, paints, and methods of painting your kitchen cabinets, but how do you know which is the one that will keep for years? As I waited and researched, more products became available.
I have read through reviews on Consumer Reports and throughout the interweb. Everyone seems to have their thoughts on what products to use. I have found many sites implying that you can get away with one paint coat (and this is ABSOLUTELY WRONG), no prep work (AGAIN WRONG), and recommend inferior products and methods.
I have worked with wood and upcycling wood projects for as long as I can remember. Let’s go over some methods I know to be true about painting wood in general. The same holds for wood cabinets. Let’s go over some myths about painting.
Painting Kitchen Cabinets THE WRONG WAY
- Painting with just one coat of paint. The truth is that you will need at least two coats of primer & two coats of really good high-quality paint. DO NOT purchase paint & primer in one. These work fantastic for walls, not cabinets that will be handled a lot. There are no shortcuts.
- Stay away from inexpensive low-quality paint & primer. It is just that – CHEAP! You pay for what you get. And, many of these products can cause damage to your cabinets, and you will find that you need to fully replace them due to chipping or texture problems.
- No prep is needed. Okay, first your kitchen cabinets need a proper cleaning to remove all the built-up dirt and grease from cooking. You can not just paint on top of that. Think about it for a second. Your paint will adhere to grease. In just a few months, those spots will bubble up and your newly painted cabinets will peel. For any paint to adhere properly, you will need to scuff up the surface. All it needs is light sanding and dusting off before starting.
What You Will Need To Paint Your Kitchen Cabinets
I will go over in better detail why I chose the paint and primer that I used for this project.
- Cleaner to degrease your cabinets (my favorite cleaning method)
- Proper Safety gear – goggles & mask
- Sandpaper 120 grit
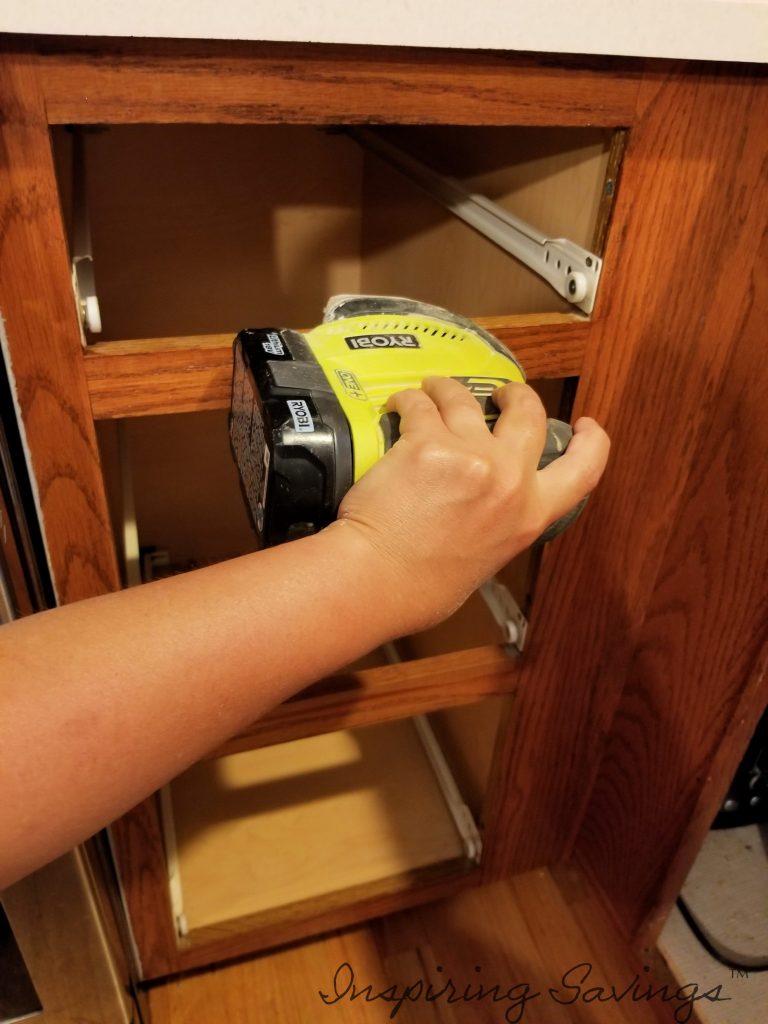
- A small mouse-like sander
- High-quality paintbrush (I prefer Purdy brand)
- High-quality paint roller (Again, Purdy is my brand of choice. Cheaper versions will lose bristles or hairs from the brush. You don’t want that showing up while you paint.)
- Drop Clothes
- Ladder
- Painter’s tape
- Primer – Kilz Adhesion Primer (Not Carried In-Store)
- High-Quality Paint for Kitchen Cabinets – Behr Urethane Alkyd Semi-Gloss Enamel Interior/Exterior Paint
Picking The Right Primer & The Best Paint
Please note: Laminate cabinets require a special bonding primer. The laminate must be in good condition for the best results. The primer I choose will be the best one for laminate as well as wood. If working with previously painted surfaces, you will need to remove existing paint.
The right primer – Applying a primer is an important step in the painting process. Primer provides a suitable surface for the paint to stick to, and it covers imperfections. I chose Kilz Adhesion Primer. Which can only be purchased online and purchasing this paint from Amazon was the easy way to do it.
The shipping was great, and the primer was well-packaged. I chose this paint as I have a combination of wood fronts and side panels that are laminate pieces.
The type of paint matters – It is important to make sure your paint is acrylic or enamel, not vinyl. These types of paints are durable and easy to clean up. I chose BEHR Urethane Alkyd Semi-Gloss Enamel paint. It provides the performance and durability of a traditional oil-based paint with the ease of use and convenience of being water-based paint.
Choosing a semi-gloss will help with clean-ups and spills. High gloss can make knicks and scratches show up easily. I didn’t go traditional with my kitchen at all, no white paint for me. I also didn’t go with the latest trend, black paint (which I do love). You have so many great options.
Choosing Your Workspace
Prepare a work area that will contain good ventilation, such as a basement or garage. Be mindful of choosing a spot that has any loose dirt as it may kick up and land on your freshly painted cabinet doors.
Clean up or sweep the area before starting prep work. I like to have a microfiber cloth on hand at all times. These types of clothes pick up the tiniest specs of dirt.
Prepping Your Cabinets
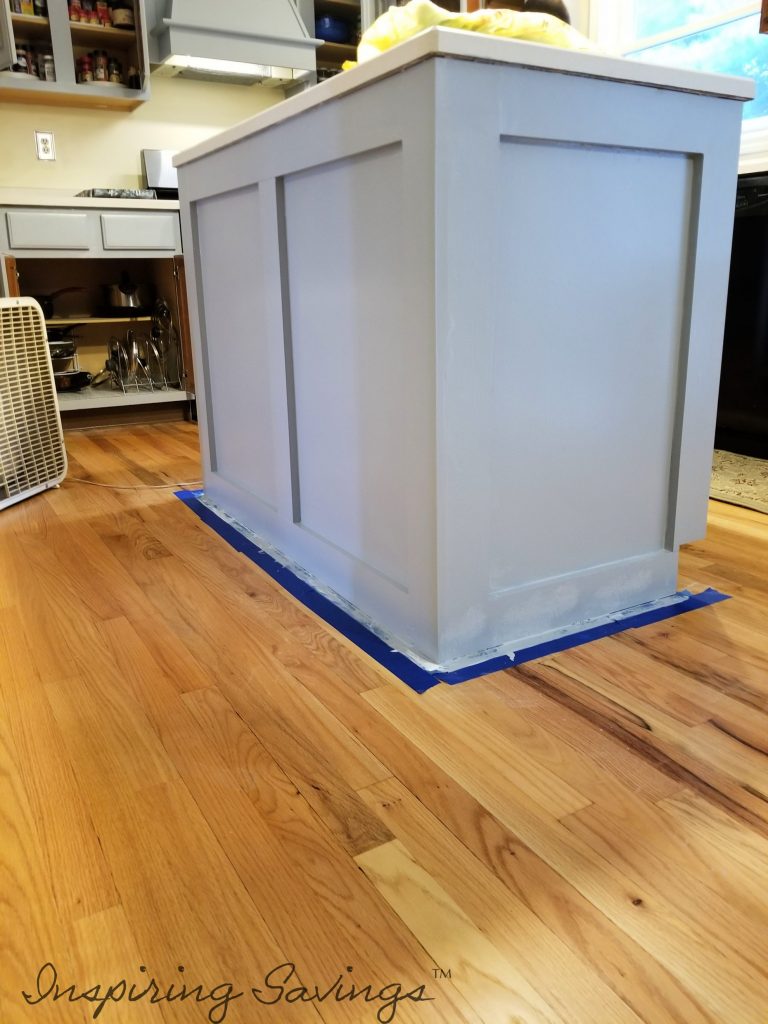
During this next step, empty out cabinets where dust may intrude on food or dishes. Cover countertops & appliances with plastic drop cloths. Remove all cabinets, doors, and drawers, and label where they go with painter’s tape so you can reinstall them in the right spots later.
I would also place all the hardware in a plastic bag or cup. Label this as well. Now, this is a very important step. Your prep work will set you up for priming and painting. Without good prep work, all your work will be in vain.
Any imperfections that aren’t fixed will only be magnified once they’re painted. Since we are talking about kitchen cabinets, it goes without saying that there will be dirt, possibly food spills, and grease on your cabinets.
All of this will need to be removed. As mentioned above, if paint adheres to grease, dirt, or food, in the months to come, your paint will bubble up and peel. No bueno!
Cleaning Your Cabinets
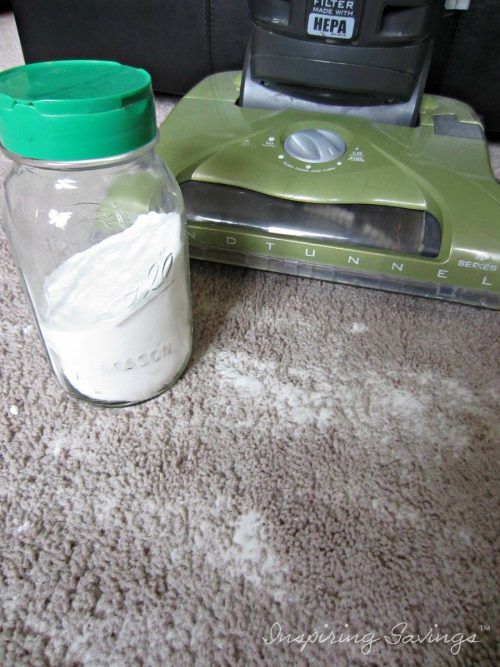
A few years back, I came up with an all-natural cleaning mixture. I was tired of using toxic chemicals to clean my cabinets. None of them worked that well. This mixture just requires just one swipe, no elbow work involved. You can check out this cleaning mixture here.
Clean all six surfaces of each drawer or cabinet door, as well as the face frames and exposed sides of the boxes. Once the cabinets are clean and completely dried, it is time to lightly sand your surfaces. You can use a mouse sander with 120-grit paper or hand sand.
Sanding will ensure that the primer will be able to adhere properly. Dents and holes can be filled with wood filler. Follow instructions per wood filler and sand. Then, use a dry paintbrush or a wet/dry vacuum to remove the dust before wiping the surfaces with a tack cloth.
Priming Your Kitchen Cabinets
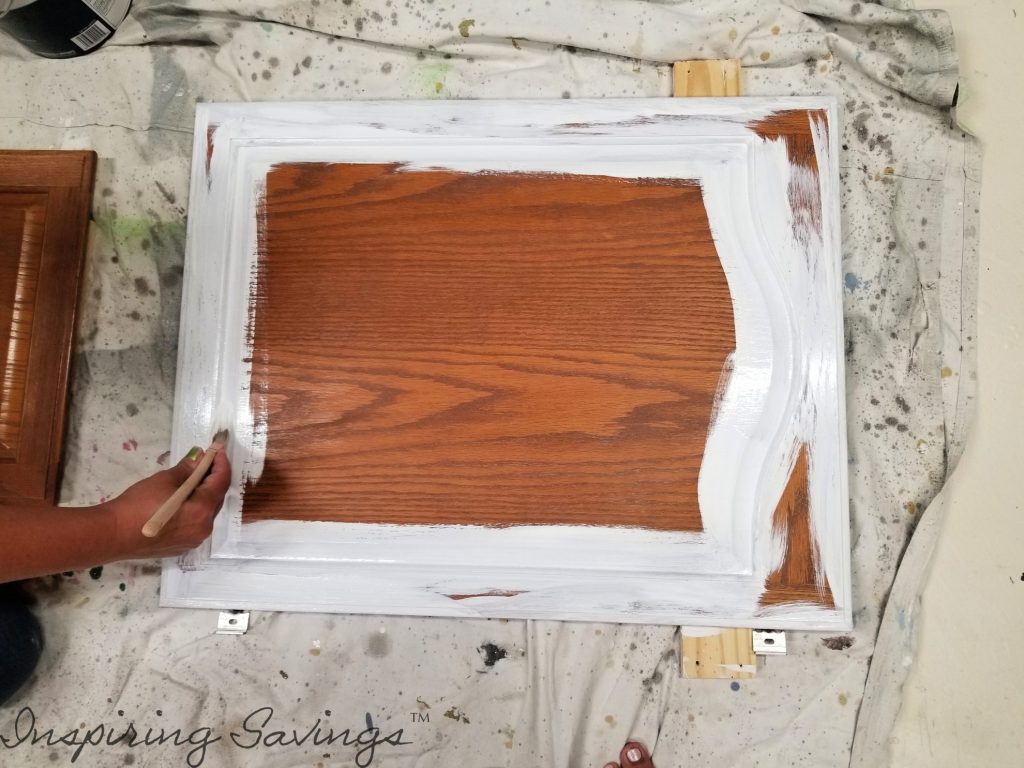
As mentioned before, a top coat of paint will probably be flake-free without a good primer beneath it. To get a good base, you will need to use two coats of primer.
The best primer (in my opinion) is the Kilz brand. No other brand can out-stand and bond like Kiltz. I chose their adhesion bonding primer (available online only, not in stores). My cabinets are a mixture of finishes. I have oat fronts, side panels that have a laminate-type feel, and bases that are composite oat casings.
Painting your Kitchen Cabinets
After the two coats of primer have completely dried, it is time to paint those cabinets. Your kitchen cabinets will face lots of hands-on activities. We know that the kitchen can be a busy place. This is why the durability of the paint you choose is very important.
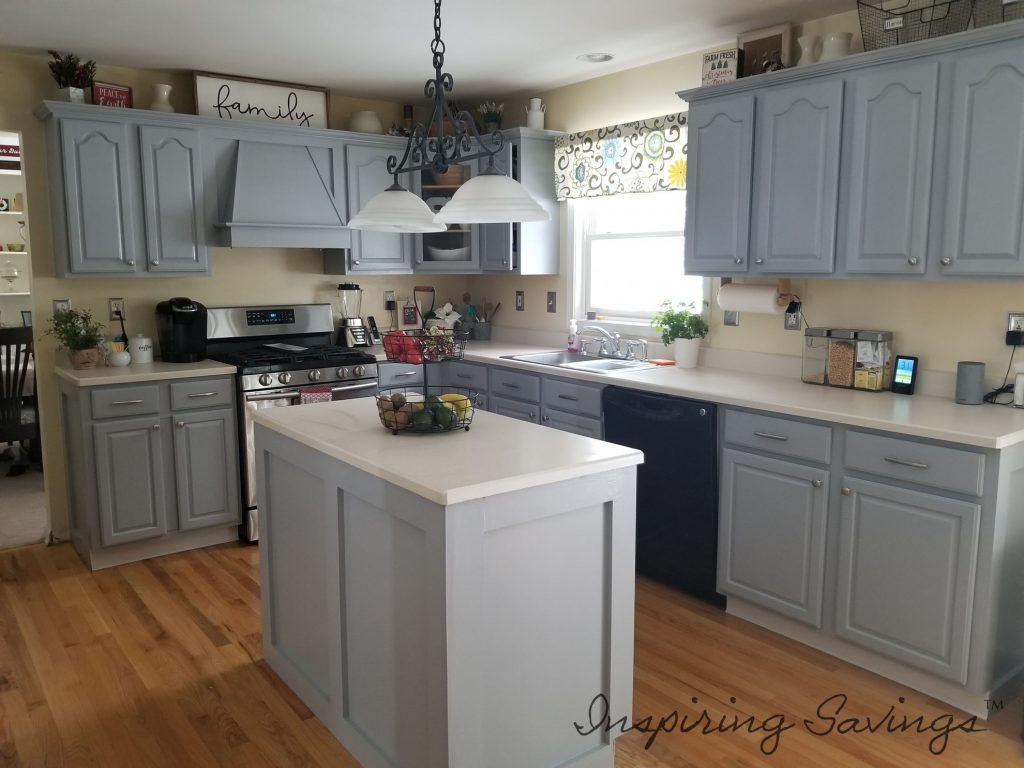
It’s best to go with semi-gloss, or if you want them really shiny gloss. The cabinets will be easier to clean than if you paint them with flat or eggshell. I chose to use BEHR Urethane Alkyd Semi-Gloss Enamel paint. The color we choose is “Gray Cast”.
It provides the performance and durability of a traditional oil-based paint with the ease of use and convenience of a water-based paint. Please keep in mind that there are select colors available. In-store, you will find a booklet of colors specifically for this paint.
Putting it all together
After your very last coat of paint is dry, it is time to collect all your hardware and put your kitchen cabinets back together. Once done, the oohs and aahs can begin. You will notice a BIG difference just by painting your kitchen cabinets.
What YOU Don’t Need
A Paint Sprayer – Not only will you need to complete more prep work but if you are unsure of how to use them it can make for more complicated work. I say skip the hassle and save money by not renting a machine.
A Professional Painter – If you follow all the steps above, and do your research, you can complete this project just like a professional painter can. Not to mention it will cost a lot less if you do the work yourself.
Other Inexpensive Upgrades
Great decorative elements that will update your kitchen and make it look like a whole new kitchen.
Under Cabinet Lighting – Having lights under your cabinets will not only make it look expensive, but it will also make your kitchen countertops look brighter.
Back Splash – There are many inexpensive options available. If you are strapped for time and don’t want to get into actual tiling. Then peel and stick versions are for you. They cost the same as tiling and go up without the mess or hassle.
Replace Outlet Wall Plates – These small little details can pack a punch. Getting rid of your old and replacing it with new can make a cheap, inexpensive and notable difference.
New Faucet – The sink and faucet are typically the focal points of the kitchen. You can easily find a fabulous-looking faucet for just under $100.
Hardware – Adding in new knobs and pulls can make a nice impact. It did for us. Before painting our cabinets, we didn’t have the hardware. After this new addition, I can’t imagine not having them. We found contract packages that were much cheaper than purchasing individually.
Other Great Home-Related Articles
Best Black Paint Colors for Kitchen Cabinets
How to Unclog Your Drain Naturally – 2 Ingredients
How To Clean Kitchen Cabinets And Degrease All Naturally
This post may contain affiliate links or sponsored content. Disclosure Policy


I’m using the same paint as you. How long do I wait to reinstall cabinet doors? I don’t want them sticking and pulling paint off?
Hi Tiffany,
I gave them a full 24 hours before I put them back on. BUT and big BUT, it is really dependent on your drying conditions. I painted during the summer months. If you have any moisture then you will want to wait longer. And I would be cautious as well about the sticking. They will actually take a full week to cure even if they are not tacky, if after 24 hours. So just be mindful of that.
Did you sand after primer? I’m getting so so much texture I worry about painting over it
Angie,
Did you not have any issues at all with this paint? I’m having trouble left and right. In some areas it comes out great, others not so much. I’m using a high quality brush and roller but am still getting brush marks and dimpling. I sanded and primed the cabinets before painting as well. It’s got me pulling my hair out in frustration!
Hi Cody, which paint are you using? The prime doesn’t go on evenly. And many factors go into painting. As an example, if it is too humidity or hot in the house… the coats will not seem thick as mud and will not cover well. AND prep work prior to painting is a must. If you don’t get all the grease and crime off.. the painting will be a bear. I would love to help.. Just lets us know what difficulties you are having.
I’m using the same paint that was used in this post. Behr urethane alkyd satin enamel. I’ve degreased all woodwork, sanded with 120, and dusted with my shop vac and tack cloth. However, it’s consistently been about 80% humidity and 20F outside but 70F in my home. The paint seems to go on fine but there’s a noticeable orange peel texture here and there for some reason. I’ve mostly used a Purdy foam roller as I noticed the brush often left strokes after a couple-few coats. I’ve waited about a day and a half between coats as well. It’s been a week since I painted one portion and the paint is still somewhat tacky?
Hi Cody,
You are doing everything right!!!! You have the right temp, paint, prep work, and brushes (purdy is the best). What I can tell you from my past use.. This is my kitchen in the post. This paint is not like normal paint. It is much thicker and I noticed too. I would try to put a lot less on your brushes. Do smaller coats and let them dry completely in between. I have no doubt that some of them are still tacky. It is a much thicker paint. I hope my suggestion helps and your cabinets end up turning out fabulous.
Hello, your kitchen looks amazing! What color did you use for the cabinets and also the color for the countertop makeover? I couldn’t tell if it was the natural white or bright white (for the countertops)
Thanks!
Hey Angie,
Thank you so MUCH!!! And I can’t believe I didn’t mention the color. I just updated my post. The color of my cabinets is called Gray Cast. The special Behr paint comes in a limited amount of colors. Well, limited in the sense that you choose from a brochure and not a wall of colors. It seems that the paint color in our kitchen often looks more periwinkle at times. But we love it. And get a lot of compliments about the color.
The countertop color is found in this post https://www.inspiringsavings.com/update-your-kitchen-countertops I used a specialized kit. And there are so many different colors. I went with what they call natural white. Good luck on your kitchen. I know first hand how much research needs to happen first.